Journal
Building a table for the nth time
Now that I have the navigation roughed-in for the Cushion rethink, I can start building my first feature-based view. Since the goal of this exercise is to return to Cushion’s prime—with a side-goal of building the perfect Cushion for my wife, a freelance lettering artist who wants to do admin work as little as possible—I’m focusing on invoicing and income tracking. These are the two aspects of freelancing that every freelancer needs to do, so it’s a solid target. When I think about where to start, I need to strip everything down and think in terms of usable milestones. While the visualizations are the most compelling part of Cushion’s design, they’re not the most useful on their own. These at-a-glance visuals can only tell you so much before you need to dive into the details. This leads me to the tables.
If I’m looking to build a working app sooner than later—and I’ve already proof-of-concept’d out the fun-yet-uncertain parts—then I can start with the boring-yet-essential parts. These tables are basically spreadsheets fed from the database. They ingest the data, display it, and add it all up in a way that’s useful for freelancers. At the end of the day, when a user is looking for a specific date, invoice amount, or payment status, they’re going to look at the tables first. Then, for a quick look at their progress over the year, they’ll check out the visualizations.
Believe it or not, I’ve actually built half a dozen versions of these tables for Cushion over the years, and what I’ve realized from revisiting the code is that my age and experience is directly correlated with my “cleverness”—or lack thereof. The younger I was when writing the code, the more roundabout my approach was. As I got older, my code became more straightforward. I’ve found that this applies to my code in general, but it was truly highlighted when revisiting the code for my tables.

Table component built with Vue.js circa 2014
The first table I built for Cushion was actually written with Vue.js, but it never made it to production because I switched to Angular shortly after. Vue.js was brand new at the time and not battle-tested enough for me to have confidence in it yet. As a funny aside, I know for a fact that the journal post about this table was written a long time ago because its images weren’t even retina yet!
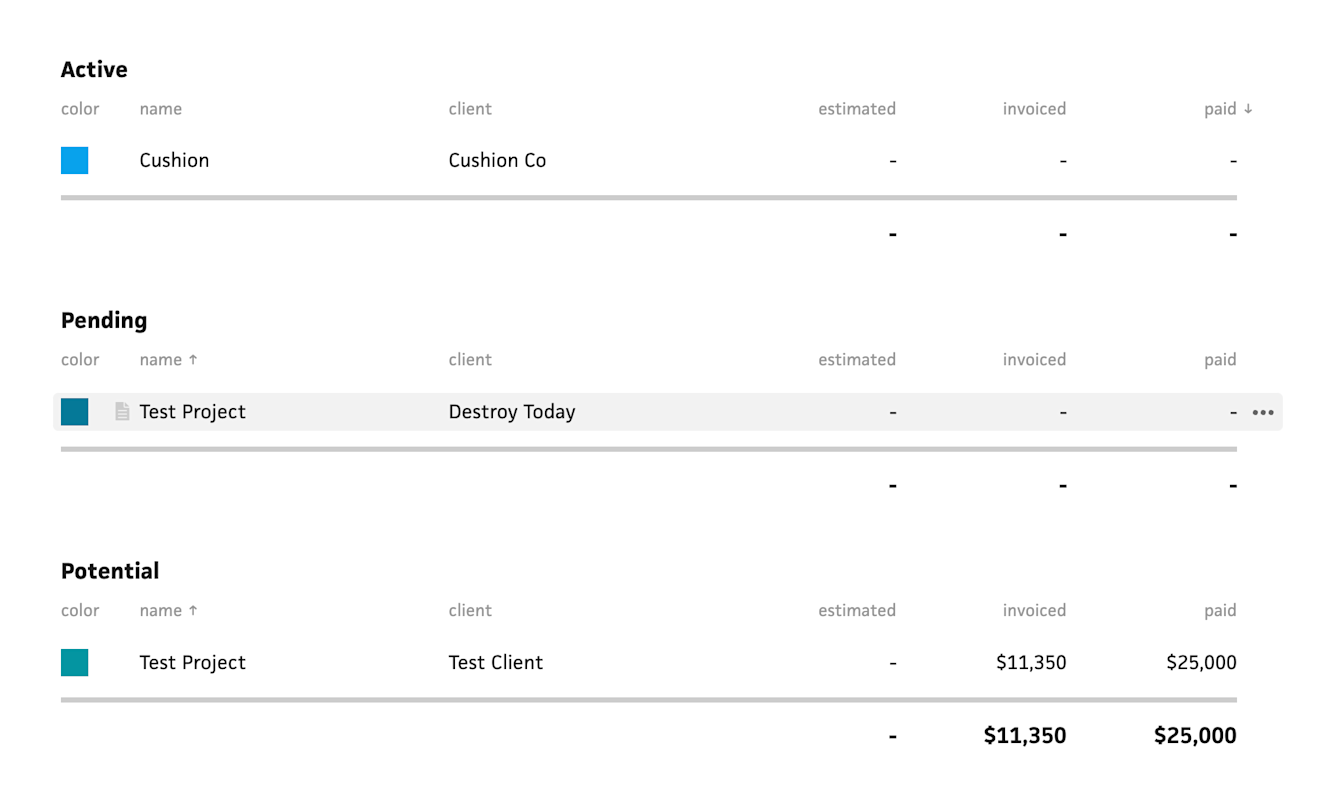
Table built with Angular and string concatenation circa 2014
The first table that made it to production is hilariously a single Angular file that takes a config object and renders the HTML by plus-equalling a string all the way down… Yeah, you heard right. I assume this was for performance reasons (because Angular), but it’s also complete madness. At the same time, the code is well-organized and pretty easy to grasp, but here’s the best way to put it: I wouldn’t want to see this code on the first day of my new job.
Table built with Angular and lodash templating circa 2016
The next iteration of the table was a CoffeeScript class that gets extended and uses getter methods for everything. Again, too clever and requires a sherpa to find your way around the code, but at least I used templates this time (with lodash) instead of manually concatenating a string. I did notice, however, that I completely abandoned semantics with this version by ditching <table> tags in favor of living in <div> city for easier styling. Little did I know you can have the best of both worlds with semantic tags, easy styling, and proper accessibility, but I didn’t learn that until years later.
Table built with Vue 2 Options API circa 2017
The most recent iteration of the table (albeit five years ago) uses Vue 2’s Options API and Mixins. This approach had a lot going for it because of Vue’s templating and reactivity, which was a huge leap forward because I no longer needed to manually re-render the HTML with every change. I still relied heavily on config objects, but they were now computed properties, so I also didn’t need to directly call getter methods like before—I simply looped through the data and referenced the properties.
My overall gripe with this version was the use of mixins. I never loved mixins in Vue because it’s never clear what a mixin is doing under the hood unless you dig through the code. This makes troubleshooting and searching for specific references really difficult—especially when a mixin creates props or reactive data. This is also why I’m head-over-heels for Vue’s composition API because, combined with composables (aka “hooks”), everything you need to reference is exposed, and it feels like writing straight vanilla JavaScript—nothing is buried and nothing feels “magical” (in the way that you can’t understand or troubleshoot it).
Ok, phew. This brings us to today. I’m building a table for the nth time, but the scenario is different:
I have 10 more years of experience under my belt
I now fully test the frontend, which helps to weed out “clever” code
I’m committed to semantic HTML and accessibility, so the markup will be “proper”
I’m using Vue 3 with the Composition API, which is the closest Vue’s syntax has gotten to clean ol’ vanilla JS
I haven’t finished building the table, so this post is somewhat premature, but there was plenty of “history” to share before writing about the latest iteration. That said, I’m making great progress already.
Table built with Vue 3 Composition API circa 2023
I mentioned before about using <table> tags with proper accessibility and flexible styling. Here’s what I meant. If we keep the <table> as display: table, styling is affected by the default table styles, which make certain styles impossible, like putting a bottom border on a <tr>. If, however, you set the table’s display to grid or flex, you can gain the styling flexibility, but you also lose accessibility—the table will no longer have its “table” role (in Safari, at least. It looks like other browsers no longer drop the role as of the time of this writing). Fortunately, it’s not difficult at all to reinstate accessibility roles for the table by simply setting the role attribute on each element. Every single table element has its own role value, and since I’m writing my own components for these elements, it couldn’t be easier to set these roles once and have them applied everywhere. I could actually write an entire post about this, but… it’s getting late, so I’m going to stop here.
While I do feel great so far about how I’m building this table component, I know I’m still in the easy stage—I have yet to implement any interactions, including sorting, drag & drop, or context menus, so there’s still plenty to work through. That said, I feel like I’m in the best position I’ve ever been in to write the most future-proof version of this table yet. And I know—it’s just a table. But when you’ve iterated on a single component over the course of a decade, recreating it every few years with the latest tech becomes a fun exercise, like building a to-do app with different frameworks. Or maybe I’m strange for thinking this is fun… It is fun, though, …right?