
Creating Invoices
Cushion makes invoicing really easy. The interface is simple, yet flexible and accommodating to various complexities of invoices.

Let’s start by clicking the New button from the Invoice tab and selecting the Invoice option.
Clients, Contacts, and Projects

When you create an invoice, you first need to specify the client and contact. The email of the contact is used when sending the invoice email.

Assigning invoices to a project is optional, but recommended. If you’re invoicing the client for several projects, you can select the Multiple Projects option, which lets you specify a project per line-item.
Invoice Numbers

Each invoice has a number for reference. Under the preferences, you can specify whether to auto-increment invoice numbers by client, project, or across all invoices.
Cushion requires you to manually enter your first invoice number, so it can detect the pattern to increment by. As long as your invoice number pattern ends in a number (e.g. 001, INV-001), Cushion can automatically increment it.
Notes

Like clients and projects, invoices can also have notes. These notes are for you and not displayed on the invoice itself. When looking at your list of invoices, you can view an invoice’s note by hovering the row and clicking the note icon.
Invoice Details

Along with notes, invoices can include details for the client, like payment terms, late fees, etc. These details appear at the bottom of the invoice. Cushion supports Markdown for this field, so you can include a header, style your text, or even insert a table.
Line Items
Cushion uses line items to itemize the work you’ve completed for your client.

Line item descriptions can be as simple or complex as you need them to be. With support for multiple lines, you can list tasks or write a more thorough description.

Cushion supports a handful of quantity formats. Along with number quantities, you can also use time formats, including day-rates and week-rates.
Discounts

If you’re one of those incredibly friendly freelancers who gives their clients discounts, Cushion has you covered, and will calculate the total in realtime.
Tax Rates
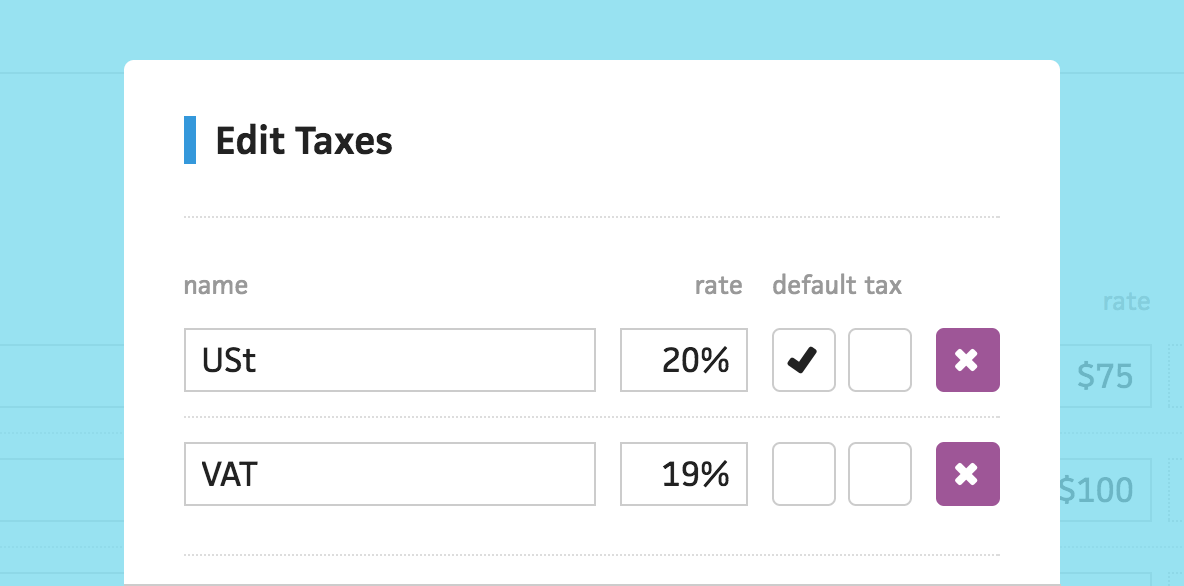
Cushion also supports tax rates, but they’re only displayed if you specifically enable them—this helps keep the interface clean for freelancers who don’t use tax rates.

When you click to enter a tax rate, a helper menu will appear to easily insert a saved tax.
Schedule
The last section in the invoice form is for the invoice’s schedule. Cushion uses these dates to visually track your invoices and calculate whether clients pay on time or late.
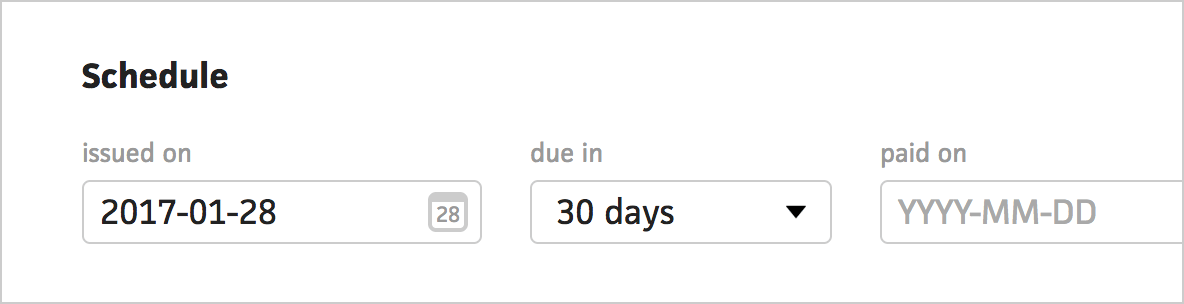
The issued and paid dates are self-explanatory, but for when the invoice is due, you can either select a duration or a specific date. If you use the same net across all clients, you can set a default net in the preferences.
When you’re all done, click the save button and Cushion will redirect you to the invoice’s page, where you can view its timeline, edit its template, and send the invoice to your client.
Next: Customizing Invoices